Cygwinの個人的セットアップ(GNU Global + Pygments + Vim)

はじめに

自宅ではMacですが職場ではWindows7なのでターミナルで操作したいときはCygwinを使うようにしてます。 本エントリではCygwinをインストールする際に、まず始めに実施する個人的セットアップをまとめます。

Cygwinのインストール

以下のURLからCygwinインストーラーをダウンロードしてインストールします。 https://cygwin.com/install.html

インストールの過程では最低限以下のパッケージを選択します(あくまで個人的に必要なものです)。

  • gcc-core
  • libncurses-devel
  • make
  • python3
  • python3-pygments
  • vim
  • wget
  • git

パッケージ管理ツールの整備

Cygwinインストーラでもパッケージの管理が可能ですが、ターミナル上で利用可能なツール「apt-cyg」をインストールします。

wgetのプロキシ設定(必要な場合のみ)

/etc/wgetrc

 82 # You can set the default proxies for Wget to use for http, https, and ftp.
 83 # They will override the value in the environment.
 84 https_proxy = ...
 85 http_proxy = ...
 86 ftp_proxy = ...
 87 proxy_user = ...
 88 proxy_passwd = ...
 89
 90 # If you do not want to use proxy at all, set this to off.
 91 use_proxy = on

apt-cygのインストール

$ wget https://raw.githubusercontent.com/transcode-open/apt-cyg/master/apt-cyg
$ chmod 755 apt-cyg
$ mv apt-cyg /usr/local/bin/

apt-cygでは次のようなコマンドでパッケージの管理ができます。

  • パッケージを検索
$ apt-cyg searchall <package_name>
  • インストール済みのパッケージを検索
$ apt-cyg search <package_name>
  • パッケージをインストール
$ apt-cyg install <package_name>

GNU Globalのインストール

以下のURLからglobal-6.6.2.tar.gz(2018/2/20現在最新)をダウンロードします。 http://www.gnu.org/software/global/download.html

Cygwin上で以下のコマンドを実行し、GNU Globalをインストールします。

$ tar xvf global-6.5.6.tar.gz
$ cd global-6.5.6
$ ./configure
$ make
$ make install

プラグインvimにインストール

$ mkdir -p ~/.vim/plugin
$ cp /usr/local/share/gtags/gtags.vim ~/.vim/plugin/gtags.vim

.vimrcにGtags用のショートカットを追加

.vimrcは後述するリポジトリから取得するため普段省略しますが、既に作成済みの.vimrcがある場合はGtags用に以下のマッピングを追加します。

~/.vimrc

map <C-g> :Gtags
map <C-h> :Gtags -f %<CR>
map <C-j> :GtagsCursor<CR>
map <C-n> :cn<CR>
map <C-p> :cp<CR>

PygmentsとGNU Globalの連携

以下のコマンドを実行します。

$ cp /usr/local/share/gtags/gtags.conf ~/.globalr

.globalrを以下の通り編集します。

~/.globalr
変更前

default:\
         :tc=native:

変更後

default:\
        :tc=native:tc=pygments:

(参考)gtagsの使用方法

解析対象のソースファイルを含むディレクトリ(最上位ディレクトリで良い)で以下のコマンドを実行することで タグファイルを作成できます。

$ gtags -v

以下のファイルが同ディレクトリに作成されていることが確認できます。
* GPATH
* GRTAGS
* GTAGS

これで、vimから変数名などにカーソルを合わせて<C-j>で参照関係を検索し、 <C-n>で次のファイルに移動、<C-p>で前のファイルに移動可能になります。

(参考)htagsの使用方法

htagsコマンドをタグファイルがあるディレクトリで実行することで、コードをWebブラウザで確認するためのhtmlファイルを出力できます (オプションは適宜変えて下さい)。

$ htags -safno -v --html-header=./encode_meta.html

日本語文字の文字化けを防ぐためにmetaタグの指定を--html-headerオプションで行います。 「./encode_meta.html」には以下の通り文字コードを指定します。

<meta http-equiv="Content-Type" content="text/html; charset=Shift_JIS" />

ドットファイルの取得

ドットファイルはgitで管理しているのでcloneします。

必要に応じて次の通りプロキシの設定を行います。

$ git config --global http.proxy http://<username>:<userpsw>@<proxy>:<port>
$ git config --global https.proxy https://<username>:<userpsw>@<proxy>:<port>

~/.gitconfig

[http]
        proxy = http://<username>:<userpsw>@<proxy>:<port>
[https]
        proxy = http://<username>:<userpsw>@<proxy>:<port>

続けて以下のリポジトリをcloneして、setup.shを実行します。 github.com

$ cd ~
$ git clone https://github.com/hiroki-sawano/dotfiles.git
$ sh ~/dotfiles/setup.sh

HiRDBで表のマトリクス分割

はじめに

データベースシステムのデータ格納方式は、性能・信頼・運用性等を考慮した上で決定する必要があります。 本エントリではこの目的において、HiRDBでデータの物理配置を制御する「表のマトリクス分割」を試してみた結果をまとめます。

表の横分割の種類

HiRDBでは表を分割して格納する場合に、大きく次の分割方法を選択できます。 このうち、今回は3点目のマトリクス分割でキーレンジ分割+FIXハッシュ分割を行います。

  • キーレンジ分割
    キーとなる値の格納条件指定または境界値指定で表を分割する。
  • ハッシュ分割
    ハッシュ関数を使用して、均等に表を複数のRDエリアに格納する。
  • マトリクス分割※
    第1次元分割列で境界値指定のキーレンジ分割をし、分割されたデータをさらに第2次元分割列で分割する。第2次元分割列には次の分割方法が指定できる。
    (a) 境界値指定のキーレンジ分割
    (b) フレキシブルハッシュ分割
    (c) FIXハッシュ分割
    ※HiRDB Advanced High Availabilityが必要

想定するシステム構成

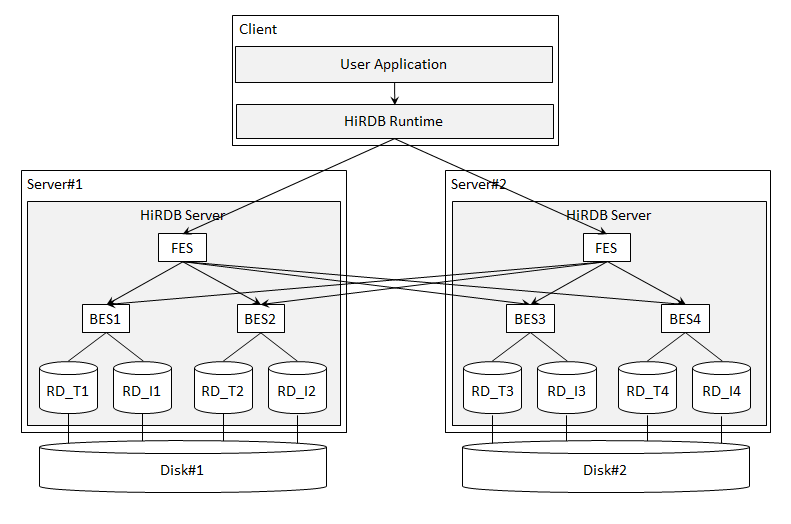
次のように複数のRDエリアが異なるディスクのHiRDBファイルシステム領域に割り当てられている場合に、 第1次元のキーレンジ分割によって、ディスク障害時の影響範囲を局所化し(信頼性向上)、 第2次元のFIXハッシュ分割でI/Oの並列処理を可能とする(性能向上)ことが狙いです。 f:id:hiroki-sawano:20180212192455p:plain

  • FES(フロントエンドサーバ):SQLの解析/最適化処理やBESへの指示などを担うサーバ
  • BES(バックエンドサーバ):FESからの指示に従ってデータベースへのアクセスや排他制御、演算処理などを行うサーバ
  • RD_T1~4:ユーザ用RDエリア(テーブル用)
  • RD_I1~4:ユーザ用RDエリア(インデクス用)

マトリクス分割の確認

それでは実際にマトリクス分割を行う表を定義し、行挿入時に指定のRDエリアがデータ格納先として使用されることを確認します。

実行環境

  • Red Hat Enterprise Server Linux 7(64-bit)/バージョン7.3
  • HiRDB Server with Additional Function Version 9
    • HiRDB/Parallel Server Version 9.65
  • HiRDB Advanced High Availability Version 9

テーブル定義の作成

列"row_type"でキーレンジ分割し、列"id1"と列"id2でFIXハッシュ分割します。
キーレンジ分割での境界値の指定は、PARTITIONED BY MULTIDIMに続けて昇順に行います。 以下の例では'10'と指定してあるため、row_typeが'10'以下の行と'10'を超過する行がそれぞれ異なるRDエリアに分割されます。
FIXハッシュ分割では、分割キーに「キー値の偏りが少ない」、「キーの値に重複が少ない」列を選択します。 また、ハッシュ関数は複数用意されていますが、リバランス表でない場合最も均等にハッシングされるHASH6を選びます。

この定義によって次の通り動作することが期待できます。
<row_type <= '10'の場合> RD_T1とRD_T2に格納
<row_type > '10'の場合> RD_T3とRD_T4に格納

MATRIX_TEST.sql

CREATE TABLE "MATRIX_TEST" (
  "id1"          INTEGER      NOT NULL,
  "id2"          INTEGER      NOT NULL,
  "row_type"     CHAR(2)      NOT NULL,
  "row_value"    VARCHAR(100)
)
 PARTITIONED BY MULTIDIM
 ("row_type" (('10')),
 FIX HASH HASH6 BY "id1","id2")
                   IN ((RD_T1,RD_T2),
                       (RD_T3,RD_T4))
 PRIMARY KEY ("id1", "id2", "row_type")
                   IN ((RD_I1,RD_I2),
                       (RD_I3,RD_I4))
;

次の通り作成したテーブル定義のSQLを実行します。

$ pddef < ./MATRIX_TEST.sql
KFPA12000-I Processing of SQL completed
$ pdsql
COMMAND ?     +----2----+----3----+----4----+----5----+----6----+----7----+
tables;
 TABLE_SCHEMA                   TABLE_NAME                     N_COLS N_INDEX CREATE_TIME
 ------------------------------ ------------------------------ ------ ------- --------------
 xxxxxxx                        MATRIX_TEST                         4       1 20180212190159

データの挿入と表分割の確認

次のデータをMATRIX_TESTに挿入しながら、経過をDB状態解析機能(pddbst)で確認します。

SELECT * FROM MATRIX_TEST;
 id1          id2          row_type row_value
 ------------ ------------ -------- -----------------------------------------------------
            1            1 10       ABCD
            1            2 10       ABCD
            2            2 20       ABCD
            2            1 20       ABCD
KFPX27010-I            4 rows selected

作業開始前の状態確認

テーブル用ユーザRDエリアの状態確認を行っていきます。
pddbstの-tオプションで解析対象のテーブル'MATRIX_TEST'を指定します。 この時点ではどのRDエリアの使用率も0%であることがわかります(記載内容はコマンド実行結果の一部抜粋)。

$ pddbst -t MATRIX_TEST
 RD Area Name   : RD_T1
  Server        : bes1
          Used(Full)       Used(      Full)        Sum
  Segment   0%(  0%)          0(         0)          0
  Page      0%(  0%)          0(         0)          0
 RD Area Name   : RD_T2
  Server        : bes2
          Used(Full)       Used(      Full)        Sum
  Segment   0%(  0%)          0(         0)          0
  Page      0%(  0%)          0(         0)          0
 RD Area Name   : RD_T3
  Server        : bes3
          Used(Full)       Used(      Full)        Sum
  Segment   0%(  0%)          0(         0)          0
  Page      0%(  0%)          0(         0)          0
 RD Area Name   : RD_T4
  Server        : bes4
          Used(Full)       Used(      Full)        Sum
  Segment   0%(  0%)          0(         0)          0
  Page      0%(  0%)          0(         0)          0

row_type'10'の挿入(1行目)

RD_T1が使用されている様子が確認できます。

$ pdsql
COMMAND ?     +----2----+----3----+----4----+----5----+----6----+----7----+
INSERT INTO MATRIX_TEST VALUES (1,1,'10','ABCD');
KFPX27010-I            1 rows inserted
…
$ pddbst -t MATRIX_TEST
 RD Area Name   : RD_T1
  Server        : bes1
          Used(Full)       Used(      Full)        Sum
  Segment 100%(  0%)          1(         0)          1
  Page      5%(  0%)          1(         0)         20
 RD Area Name   : RD_T2
  Server        : bes2
          Used(Full)       Used(      Full)        Sum
  Segment   0%(  0%)          0(         0)          0
  Page      0%(  0%)          0(         0)          0
 RD Area Name   : RD_T3
  Server        : bes3
          Used(Full)       Used(      Full)        Sum
  Segment   0%(  0%)          0(         0)          0
  Page      0%(  0%)          0(         0)          0
 RD Area Name   : RD_T4
  Server        : bes4
          Used(Full)       Used(      Full)        Sum
  Segment   0%(  0%)          0(         0)          0
  Page      0%(  0%)          0(         0)          0

row_type'10'の挿入(2行目)

2行目の挿入ではハッシュ分割されてRD_T2が使用されました。

$ pdsql
COMMAND ?     +----2----+----3----+----4----+----5----+----6----+----7----+
INSERT INTO MATRIX_TEST VALUES (1,2,'10','ABCD');
KFPX27010-I            1 rows inserted
…
$ pddbst -t MATRIX_TEST
 RD Area Name   : RD_T1
  Server        : bes1
          Used(Full)       Used(      Full)        Sum
  Segment 100%(  0%)          1(         0)          1
  Page      5%(  0%)          1(         0)         20
 RD Area Name   : RD_T2
  Server        : bes2
          Used(Full)       Used(      Full)        Sum
  Segment 100%(  0%)          1(         0)          1
  Page      5%(  0%)          1(         0)         20
 RD Area Name   : RD_T3
  Server        : bes3
          Used(Full)       Used(      Full)        Sum
  Segment   0%(  0%)          0(         0)          0
  Page      0%(  0%)          0(         0)          0
 RD Area Name   : RD_T4
  Server        : bes4
          Used(Full)       Used(      Full)        Sum
  Segment   0%(  0%)          0(         0)          0
  Page      0%(  0%)          0(         0)          0

row_type'20'の挿入(1行目)

キー値を'20'にするとRD_T4にデータが格納されました。

$ pdsql
COMMAND ?     +----2----+----3----+----4----+----5----+----6----+----7----+
INSERT INTO MATRIX_TEST VALUES (2,1,'20','ABCD');
KFPX27010-I            1 rows inserted
…
$ pddbst -t MATRIX_TEST
 RD Area Name   : RD_T1
  Server        : bes1
          Used(Full)       Used(      Full)        Sum
  Segment 100%(  0%)          1(         0)          1
  Page      5%(  0%)          1(         0)         20
 RD Area Name   : RD_T2
  Server        : bes2
          Used(Full)       Used(      Full)        Sum
  Segment 100%(  0%)          1(         0)          1
  Page      5%(  0%)          1(         0)         20
 RD Area Name   : RD_T3
  Server        : bes3
          Used(Full)       Used(      Full)        Sum
  Segment   0%(  0%)          0(         0)          0
  Page      0%(  0%)          0(         0)          0
 RD Area Name   : RD_T4
  Server        : bes4
          Used(Full)       Used(      Full)        Sum
  Segment 100%(  0%)          1(         0)          1
  Page      5%(  0%)          1(         0)         20

row_type'20'の挿入(2行目)

次のrow_type'20'の行は、RD_T3に挿入されました。

$ pdsql
COMMAND ?     +----2----+----3----+----4----+----5----+----6----+----7----+
INSERT INTO MATRIX_TEST VALUES (2,2,'20','ABCD');
KFPX27010-I            1 rows inserted
…
$ pddbst -t MATRIX_TEST
 RD Area Name   : RD_T1
  Server        : bes1
          Used(Full)       Used(      Full)        Sum
  Segment 100%(  0%)          1(         0)          1
  Page      5%(  0%)          1(         0)         20
 RD Area Name   : RD_T2
  Server        : bes2
          Used(Full)       Used(      Full)        Sum
  Segment 100%(  0%)          1(         0)          1
  Page      5%(  0%)          1(         0)         20
 RD Area Name   : RD_T3
  Server        : bes3
          Used(Full)       Used(      Full)        Sum
  Segment 100%(  0%)          1(         0)          1
  Page      5%(  0%)          1(         0)         20
 RD Area Name   : RD_T4
  Server        : bes4
          Used(Full)       Used(      Full)        Sum
  Segment 100%(  0%)          1(         0)          1
  Page      5%(  0%)          1(         0)         20

MacにPostgreSQLインストールとSQL実行計画の確認

はじめに

最近は業務でDBMSをよく扱うことからデータベース関連の書籍を読んでいます。
SQL実践入門」は性能に目を向けた内容で面白かったです。

SQL実践入門──高速でわかりやすいクエリの書き方 (WEB+DB PRESS plus)

SQL実践入門──高速でわかりやすいクエリの書き方 (WEB+DB PRESS plus)

  • 作者:ミック
  • 発売日: 2015/04/11
  • メディア: 単行本(ソフトカバー)

本書籍ではSQLの実行計画を読み解くことでSQLをチューニングしています。 紹介されている内容を実際に試してみるため、MacBookに本書籍で説明に用いているPostgreSQLをインストールすることにしました (業務で扱っているのはHiRDBですが、基本的な考え方はどのDBMSでも通用するはずなのであまり気にしないことにします)。

PostgreSQLのインストール

Homebrewでインストールします。インストールしてない場合は次のコマンドでインストールしてください。

$ /usr/bin/ruby -e "$(curl -fsSL https://raw.githubusercontent.com/Homebrew/install/master/install)"

続けてPostgreSQLをインストールして、'initdb'でデータベースクラスタ*1を作成します。

$ brew install postgresql
$ initdb /usr/local/var/postgres -E utf8                                                                                                                    
$ postgres --version
 postgres (PostgreSQL) 10.1

postgresサーバの起動

PGDATA環境変数でデータの物理的な配置を指定します。

~/.bash_profile

export PGDATA=/usr/local/var/postgres

'pg_ctl'でサーバを起動します。 -Dオプションを使用するとデータベースファイルの場所を指定することができます。 以下の例では省略しているため.bash_profileのPGDATA環境変数で指定した内容で動作します。

$ pg_ctl -l /usr/local/var/postgres/server.log start
waiting for server to start.... done
server started

データベースの作成

新規作成するデータベースの名称と所有者とするユーザを指定して'createdb'を実行します。

$ createdb example-db -O hiroki_sawano
$ psql -l
                                          List of databases
    Name    |     Owner     | Encoding |   Collate   |    Ctype    |        Access privileges        
------------+---------------+----------+-------------+-------------+---------------------------------
 example-db | hiroki_sawano | UTF8     | en_US.UTF-8 | en_US.UTF-8 | 
 postgres   | hiroki_sawano | UTF8     | en_US.UTF-8 | en_US.UTF-8 | 
 template0  | hiroki_sawano | UTF8     | en_US.UTF-8 | en_US.UTF-8 | =c/hiroki_sawano               +
            |               |          |             |             | hiroki_sawano=CTc/hiroki_sawano
 template1  | hiroki_sawano | UTF8     | en_US.UTF-8 | en_US.UTF-8 | =c/hiroki_sawano               +
            |               |          |             |             | hiroki_sawano=CTc/hiroki_sawano
(4 rows)

データベースへの接続とSQLの実行

'psql'(PostgreSQL対話的ターミナル)でデータベースに接続します。
試しに'numbers'表を作成し、複数の行を適当に挿入しました。

$ psql -U hiroki_sawano example-db
psql (10.1)
Type "help" for help.

example-db=# create table numbers(num integer primary key);
CREATE TABLE
example-db=# insert into numbers values(1);
INSERT 0 1
example-db=# insert into numbers values(3);
INSERT 0 1
example-db=# insert into numbers values(4);
INSERT 0 1
example-db=# insert into numbers values(7);
INSERT 0 1
example-db=# insert into numbers values(8);
INSERT 0 1
example-db=# insert into numbers values(9);
INSERT 0 1
example-db=# insert into numbers values(12);
INSERT 0 1
example-db=# select * from numbers;
 num
-----
   1
   3
   4
   7
   8
   9
  12
(7 rows)

SQL実行計画の確認

EXPLAINコマンドに続けてSQLを実行することで実行計画を確認できます。
WHERE句を省略したSELECT文ではSeq Scanで全行が順にスキャンされ、 WHERE句に主キー'num'への条件を付与したSELECT文ではインデクスが効いてIndex Only Scanされている様子が確認できます。

example-db=# explain
example-db-# select * from numbers;
                        QUERY PLAN                         
-----------------------------------------------------------
 Seq Scan on numbers  (cost=0.00..35.50 rows=2550 width=4)
(1 row)

example-db=# select * from numbers where num = 3;
 num 
-----
   3
(1 row)

example-db=# explain
example-db-# select * from numbers where num = 3;
                                   QUERY PLAN                                    
---------------------------------------------------------------------------------
 Index Only Scan using numbers_pkey on numbers  (cost=0.15..8.17 rows=1 width=4)
   Index Cond: (num = 3)
(2 rows)

参考

MacにPostgreSQLをインストール - Qiita
PostgreSQL: Documentation: 10: PostgreSQL 10.13 Documentation

*1:1つのサーバインスタンスで管理されるデータベースの集合

Synology DiskStation DS215jにSpring bootアプリをデプロイ

はじめに

自宅で常時稼働しているSynologyのDS215jに先日構築した'roomba_client'をデプロイし、
ネットワーク上の各デバイスからいつでも簡単にルンバを操作できるようにしました。

hiroki-sawano.hatenablog.com

環境

DS215jにSSH接続

DS215jにSSH接続するためには設定を変更する必要があります。
Control Panelで右上の「Advance Mode」を押下します。

f:id:hiroki-sawano:20180106043316p:plain

遷移先の画面で「Terminal & SNMP」を選択します。 f:id:hiroki-sawano:20180106043408p:plain

Enable SSH Serviceにチェックを入れ、Portにポート番号を指定します。 f:id:hiroki-sawano:20180106043430p:plain

以上で、ターミナル等からSSH接続が可能になります。

$ ssh <user_name>@<ds215j_ip_address> -p <port_number>

ビルド

DS215jにデプロイするSpring bootのFully Executable Jarを作成するため、
build.gradleに次の設定を追加し、gradle buildします。

build.gradle

springBoot {
  executable = true
}
$ gradle build

デプロイとサービス登録

DS215にビルドしたroomba_client.jarを配置します。

$ ls <deploy_destination>
roomba_client.jar

Upstartでサービスを管理するため/etc/initにroomba-client.confを作成します。
これでroomba-clientがdaemon化され、システム起動時に自動で立ち上がるようになりました。 /etc/init/roomba-client.conf

description "roomba_client daemon"
author "Hiroki Sawano <hiroki.sawano.2512@gmail.com>"
start on runlevel [2345]
stop on runlevel [016]
respawn # attempt service restart if stops abruptly
exec <java_installation_path>/java -jar <deploy_destination>/roomba_client.jar

動作確認

roomba-clientを起動します。 ここでは手動で起動しています。

$ initctl list | grep roomba-client
roomba-client stop/waiting
$ sudo start roomba-client
roomba-client start/running, process 11518
$ sudo tail -f /var/log/upstart/roomba-client.log
…
…jp.gr.java_conf.hs.roomba.client.Roomba  : Connected to Roomba
…
…j.g.j.hs.roomba.client.RoombaClient      : Started RoombaClient in 67.775 seconds (JVM running for 71.916)

Webブラウザからアプリケーション(<ds215j_ip_address>:8080)にアクセスすると正常起動していることが確認できます。

f:id:hiroki-sawano:20171203174800p:plain

Travis-CIとCoverallsでJavaアプリケーションの単体テスト

はじめに

今更ながら継続的インテグレーション(CI)環境を整え、自動単体テストのための仕掛けを用意しましたので、 本エントリに実施した事項をまとめます。

以降では、先日紹介したroomba_clientプロジェクトを対象に説明します。

hiroki-sawano.hatenablog.com

テストコードの実装

次のようなテストコードを用意します。 今回は単にテストを動かすことが目的なので詳細は説明しませんが、 RoombaControllerTests::index()では"/"にアクセスした際のページ遷移先や、Viewに渡すデータが期待通りに設定されていることを確認しています。 RoombaControllerTests::addCommand()では"/invoke?add="へのPOST要求でDBへの行挿入のメソッドが呼び出されていることを確認しています。

@RunWith(SpringRunner.class)
@WebMvcTest(RoombaController.class)
public class RoombaControllerTests {
    @Autowired
    private MockMvc mvc;
    @MockBean
    private MyDataRepository repo;
    @MockBean
    private Settings settings;
    @MockBean
    private Roomba roomba;

    private Command c1 = new Command("c1", "seq1");
    private Command c2 = new Command("c2", "seq2");

    private Map<String, String> selectItems = new HashMap<String, String>() {
        private static final long serialVersionUID = 1L;
        {
            put("foo", "fooVal");
            put("bar", "barVal");
        }
    };

    @Before
    public void before() {
        given(this.roomba.connect("192.168.0.20", 9001)).willReturn(true);
        given(this.roomba.send("128")).willReturn(true);
        given(this.roomba.disconnect()).willReturn(true);
    }

    @Test
    public void index() throws Exception {
        List<Command> commandList = new ArrayList<Command>();
        commandList.add(c1);
        commandList.add(c2);
        given(this.settings.getSequences()).willReturn(selectItems);
        given(this.repo.findAll()).willReturn(commandList);
        MvcResult mvcResult = this.mvc.perform(get("/")).andDo(print()).andExpect(status().isOk())
                .andExpect(view().name("index")).andExpect(model().attributeExists("userInput"))
                .andExpect(model().attribute("dataTable", commandList)).andReturn();
        ModelMap modelMap = mvcResult.getModelAndView().getModelMap();
        Object uio = modelMap.get("userInput");
        assertThat(uio, is(not(nullValue())));
        assertThat(uio, is(instanceOf(UserInput.class)));
        UserInput ui = (UserInput) uio;
        assertThat(ui.getSelectItems(), is(selectItems));
    }

    @Test
    public void addCommand() throws Exception {
        this.mvc.perform(post("/invoke?add=").param("name", "command_name").param("selectedSequence", "")
                .param("arbitrarySequence", "128 131")).andDo(print()).andExpect(redirectedUrl("/"))
                .andExpect(model().hasNoErrors());
        verify(repo).saveAndFlush(Mockito.any(Command.class));
    }

Travis-CIの設定

続けてTravis-CI(https://travis-ci.org/)の設定です。
試験対象プロジェクトのリポジトリと連携した後、 .travis.ymlをGitリポジトリのルートに配置します。 今回はSpring bootアプリなのでlanguageにはjavaを設定し、jdkを指定します。

.travis.yml

language: java
jdk:
 - oraclejdk8

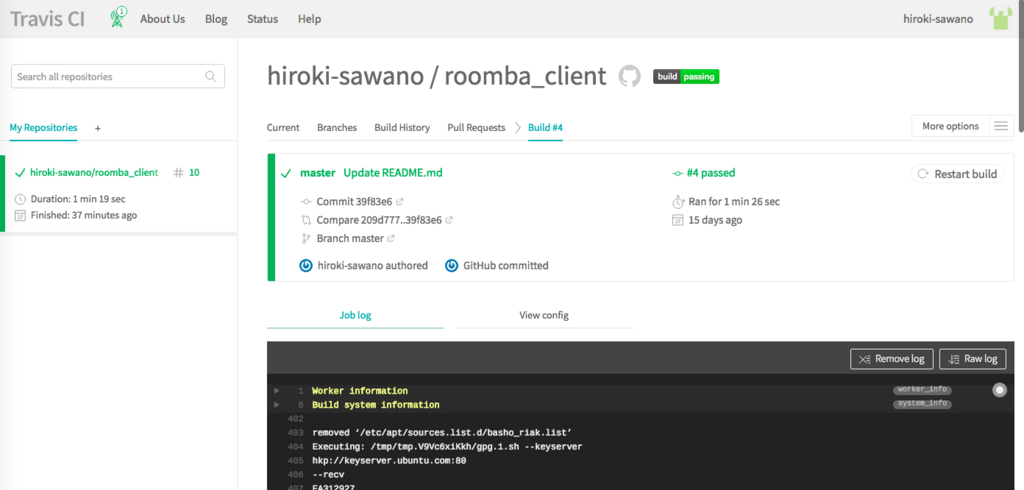
以上でリモートリポジトリにPushする度に自動的にビルド(テスト含む)が実行されるようになりました。 f:id:hiroki-sawano:20171224165144p:plain

Coverallsプラグインの追加

Travis-CIで実行されたテストのカバレッジレポートを確認できるようにするため、Coveralls(https://coveralls.io)と連携します。 カバレッジレポートはJacocoプラグインで出力します。

まず、build.gradleにjacocoとcoveralls-gradle-pluginを追加します。 jacocoTestReportにはレポートの出力形式を指定できますが、どうやらCoverallsはXML形式のレポートが必要なようなので xml.enabled = trueを設定します。

build.gradle

buildscript {
    ext {
        springBootVersion = '1.5.7.RELEASE'
    }
    repositories {
        mavenCentral()
    }
    dependencies {
        classpath("org.springframework.boot:spring-boot-gradle-plugin:${springBootVersion}")
        classpath("org.kt3k.gradle.plugin:coveralls-gradle-plugin:2.6.3")
    }
}

apply plugin: 'java'
apply plugin: 'eclipse'
apply plugin: 'org.springframework.boot'
apply plugin: 'jacoco'
apply plugin: 'com.github.kt3k.coveralls'

jacocoTestReport {
    reports {
        xml.enabled = true //coveralls plugin depends on xml format report
        html.enabled = true
    }
}

続けて、Travis-CIでビルド後にCoverallsにカバレッジ情報を転送するための設定です。
.travis.ymlのafter_successに次の設定を追記します。

.travis.yml

language: java
jdk:
 - oraclejdk8
after_success:
 - ./gradlew test jacocoTestReport coveralls

カバレッジレポートの確認

以上の設定により、GitにPushするとCoverallsで単体テストの結果が確認できるようになります。 f:id:hiroki-sawano:20171224162251p:plain

f:id:hiroki-sawano:20171224162508p:plain

f:id:hiroki-sawano:20171224162525p:plain

GithubのREADMEにバッジを追加

最後にGitのREADME.mdにビルド結果とカバレッジ率を示すバッジを貼り付ければ完成です。 f:id:hiroki-sawano:20171224170943p:plain f:id:hiroki-sawano:20171224162308p:plain f:id:hiroki-sawano:20171224161953p:plain

[Roomba Hack] Spring boot Webアプリからルンバ800(+RooWiFi)を操る

はじめに

ルンバ800をハックしました。 Webアプリからルンバと通信することで掃除をさせたり、音楽を流したり、スケジュールを変更したり、できるようにしました。

準備

ルンバと無線通信するため「RooWiFiルンバ用無線LANモジュール(RB-Roo-01)」をルンバに搭載しました。
http://www.robotshop.com/jp/ja/roowifi-wifi-module-roomba-v2.html

インストール手順はこちらを参照しました。
http://www.roowifi.com/wp-content/uploads/RwRemote_User_Guide_v2_rev15.pdf

ルンバとTCP/IP通信

ルンバを操作するためのインタフェースはThe Roomba Open Interface(OI)として公開されています。 こちらの仕様に記載のコマンドをソケット通信でルンバに送り込めばルンバを好きなように操ることができます。
http://www.irobot.lv/uploaded_files/File/iRobot_Roomba_500_Open_Interface_Spec.pdf

Spring bootアプリの構築

ルンバと通信するためのWebアプリケーション(roomba_client)を構築しました。
日々改良中ですが、形になってきたので公開します。 https://github.com/hiroki-sawano/roomba_clientgithub.com

roomba_clientの起動

アプリケーションを起動し、ブラウザよりアクセスすると次の画面が表示されます。 f:id:hiroki-sawano:20171203174800p:plain

アプリケーションの立ち上げ時にはルンバへの接続が成功したことを示すメッセージが出力されます。
roomba_client/event.log

2017-12-07 05:12:58.522 ... hs.roomba.client.RoombaController : Connected to Roomba

複数コマンドの連続実行

任意のコマンド名と前述したOIの仕様に従ったシリアルシーケンスを入力し、'ADD COMMAND'ボタンでデータテーブルにコマンドを実行順に追加していきます。
シリアルシーケンスは直接入力(Arbitrary Sequence)でもかまいませんが、いくつかセレクトボックス(Selectable Sequence)で選択可能としています。
こちらの例では、①セーフモードへの移行、②曲の登録、③曲の再生を実行し、ルンバから音楽を再生しています。
f:id:hiroki-sawano:20171207052956g:plain

ログ情報は次の通りです。
roomba_client/event.log

2017-12-07 05:16:42.356 ... hs.roomba.client.RoombaController : 
Adding new command : name=start serialSequence=128 131
2017-12-07 05:16:48.832 ... hs.roomba.client.RoombaController : 
Adding new command : name=song serialSequence=140 0 7 76 16 76 32 79 16 79 16 77 16 74 16 72 32
2017-12-07 05:16:55.268  ... hs.roomba.client.RoombaController : 
Adding new command : name=play serialSequence=141 0
2017-12-07 05:16:56.944  ... hs.roomba.client.RoombaController : 
Sending serial sequence : 128 131
2017-12-07 05:16:57.959  ... hs.roomba.client.RoombaController : 
Sending serial sequence : 140 0 7 76 16 76 32 79 16 79 16 77 16 74 16 72 32
2017-12-07 05:16:58.965  ... hs.roomba.client.RoombaController : 
Sending serial sequence : 141 0

単一コマンドの即時実行

コマンドを入力後に'EXECUTE COMMAND'を押下するとデータテーブルにコマンドを登録せずに即実行します。 この例では、③曲の再生を指示するシーケンスを直接入力してルンバに送信しています。
f:id:hiroki-sawano:20171207054704g:plain

roomba_client/event.log

2017-12-07 05:17:07.290 ... hs.roomba.client.RoombaController : 
Sending serial sequence : 141 0

その他機能

データテーブルに一度登録したコマンドは実行、編集、削除が可能です。

環境設定

使用する際にはapplication.ymlにルンバのIP(roomba.ip)とポート番号(roomba.port)を最低限設定することが必要です。
必要に応じて画面中のセレクトボックスで選択可能なシリアルシーケンス(roomba.sequences)を登録することもできます。
application.yml

roomba:
  ip: 192.168.0.19
  port: 9001
  sequences:
    start_and_safe: 128 131
    start_and_full: 128 132
    clean: 135
    max: 136
    spot: 134
    seek_dock: 143
    song: 140 0 7 76 16 76 32 79 16 79 16 77 16 74 16 72 32
    play: 141 0
    end: 128
    daily_schedule: 167 62 0 0 12 0 12 0 12 0 12 0 12 0 0 0

さいごに

今でも少し遊ぶ分には十分ですが実際に日常で役立つような使い方ができるように、組み立てたシーケンスの保存やコマンドの実行間隔の指定など今後改良を加えていきます。

ブロックチェーン基盤 Hyperledger Fabric v1.0 アプリケーションの実装

はじめに

今回はHyperledger Fabricのサンプルアプリケーションを動かしてみます。本エントリは次のページで紹介されている手順に従って進めていきます。

Writing Your First Application — hyperledger-fabricdocs master documentation

実行環境

  • Max OS High Sierra Version 10.13
  • Docker version 17.09.0-ce
  • Docker Compose version 1.16.1
  • Go version 1.9
  • Node.js version 8.6

Hyperledger Fabricのダウンロード

次のコマンドを実行します。

$ mkdir ~/fabric
$ cd ~/fabric
$ curl -sSL https://goo.gl/Q3YRTi | bash

これによりブロックチェーンネットワークを構築するために必要な次のバイナリを入手します。

  • cryptogen
  • configtxgen
  • configtxlator
  • peer
$ ls bin
configtxgen     configtxlator       cryptogen       get-docker-images.sh    orderer         peer

スクリプトはHyperledger FabricのdockerイメージをDocker Hubよりダウンロードします。

$ docker images
REPOSITORY                     TAG                    IMAGE ID            CREATED             SIZE
hyperledger/fabric-ca          latest                 2736904862db        10 days ago         218MB
hyperledger/fabric-ca          x86_64-1.1.0-preview   2736904862db        10 days ago         218MB
hyperledger/fabric-tools       latest                 c584c20ac82b        10 days ago         1.42GB
hyperledger/fabric-tools       x86_64-1.1.0-preview   c584c20ac82b        10 days ago         1.42GB
hyperledger/fabric-couchdb     latest                 5b8a15e6e972        10 days ago         1.57GB
hyperledger/fabric-couchdb     x86_64-1.1.0-preview   5b8a15e6e972        10 days ago         1.57GB
hyperledger/fabric-kafka       latest                 cf09c5534ef9        10 days ago         1.37GB
hyperledger/fabric-kafka       x86_64-1.1.0-preview   cf09c5534ef9        10 days ago         1.37GB
hyperledger/fabric-zookeeper   latest                 ac127485fdc7        10 days ago         1.37GB
hyperledger/fabric-zookeeper   x86_64-1.1.0-preview   ac127485fdc7        10 days ago         1.37GB
hyperledger/fabric-orderer     latest                 2fccc91736df        10 days ago         159MB
hyperledger/fabric-orderer     x86_64-1.1.0-preview   2fccc91736df        10 days ago         159MB
hyperledger/fabric-peer        latest                 337f3d90b452        10 days ago         165MB
hyperledger/fabric-peer        x86_64-1.1.0-preview   337f3d90b452        10 days ago         165MB
hyperledger/fabric-javaenv     latest                 cd459b218651        10 days ago         1.49GB
hyperledger/fabric-javaenv     x86_64-1.1.0-preview   cd459b218651        10 days ago         1.49GB
hyperledger/fabric-ccenv       latest                 82489d1c11e8        10 days ago         1.35GB
hyperledger/fabric-ccenv       x86_64-1.1.0-preview   82489d1c11e8        10 days ago         1.35GB

開発環境のセットアップ

Hyperledger Fabricのサンプルをgitでcloneします。

$ git clone https://github.com/hyperledger/fabric-samples.git
$ cd fabric-samples

以降では次のfabcarディレクトリで作業します。

$ cd fabcar
$ ls
enrollAdmin.js  invoke.js   package.json    query.js    registerUser.js startFabric.sh

念のためdockerコンテナとネットワークを削除しておきます。

$ docker rm -f $(docker ps -aq)
$ docker network prune

すでに以降の作業を実施済みの場合には次のコマンドでfabcarチェインコード用のdockerイメージも削除します。

$ docker rmi dev-peer0.org1.example.com-fabcar-1.0-5c906e402ed29f20260ae42283216aa75549c571e2e380f3615826365d8269ba

アプリケーションの実行に必要なライブラリをインストールするため次のコマンドを実行します。 以降ではCAサーバにアクセスするためにnode_modules/fabric-ca-client、 peerやordering serviceと対話するためにnode_modules/fabric-clientを使用していきます。

$ npm install

続けて次のスクリプトを実行することでネットワークを起動します。このコマンドはFabricの各コンテナを用意します。 fabcarネットワークの詳細はこちらに説明があります。
Understanding the Fabcar Network — hyperledger-fabricdocs master documentation

$ ./startFabric.sh
$ docker images
REPOSITORY                                                                                               TAG                    IMAGE ID            CREATED             SIZE
dev-peer0.org1.example.com-fabcar-1.0-5c906e402ed29f20260ae42283216aa75549c571e2e380f3615826365d8269ba   latest                 bf75bac8b3f9        2 minutes ago       151MB
...
$ docker ps
CONTAINER ID        IMAGE                                                                                                    COMMAND                  CREATED             STATUS              PORTS                                            NAMES
b4b2e2be6dc7        dev-peer0.org1.example.com-fabcar-1.0-5c906e402ed29f20260ae42283216aa75549c571e2e380f3615826365d8269ba   "chaincode -peer.a..."   4 minutes ago       Up 4 minutes                                                         dev-peer0.org1.example.com-fabcar-1.0
a4f01226a050        hyperledger/fabric-tools                                                                                 "/bin/bash"              6 minutes ago       Up 6 minutes                                                         cli
dbce2a81cb36        hyperledger/fabric-peer                                                                                  "peer node start"        7 minutes ago       Up 7 minutes        0.0.0.0:7051->7051/tcp, 0.0.0.0:7053->7053/tcp   peer0.org1.example.com
c83fd30320e2        hyperledger/fabric-couchdb                                                                               "tini -- /docker-e..."   7 minutes ago       Up 7 minutes        4369/tcp, 9100/tcp, 0.0.0.0:5984->5984/tcp       couchdb
0dd907f8cce3        hyperledger/fabric-orderer                                                                               "orderer"                7 minutes ago       Up 7 minutes        0.0.0.0:7050->7050/tcp                           orderer.example.com
86ef00f4705d        hyperledger/fabric-ca                                                                                    "sh -c 'fabric-ca-..."   7 minutes ago       Up 7 minutes        0.0.0.0:7054->7054/tcp                           ca.example.com

ユーザの登録

前述のネットワーク立ち上げ時にadminユーザが認証局(CA)に登録されています。
enrollAdmin.jsでadminの電子証明書(eCert)を取得します。 このプログラムは公開鍵と秘密鍵をhfc-key-storeに作成し、証明書署名要求(CSR)で公開鍵証明書を発行します。
続けて、registerUser.jsではadminユーザでCAと通信しLedgerにアクセスするuser1ユーザを登録します。このプログラムもまた、CSRを実行し証明書と鍵をhfc-key-storeに出力します。

$ node enrollAdmin.js
$ node registerUser.js
$ ls hfc-key-store/
admin                                   
...-pub
...-priv
user1
...-pub
...-priv

Ledgerの参照

query.jsを使用し、fabcarチェインコードのqueryAllCarsを呼び出します。

fabric-samples/fabcar/query.js

const request = {
    chaincodeId: 'fabcar',
    fcn: 'queryAllCars',
    args: ['']
};
$ node query.js
Store path:.../fabric-samples/fabcar/hfc-key-store
Successfully loaded user1 from persistence
Query has completed, checking results
Response is  
[{"Key":"CAR0", "Record":{"colour":"blue","make":"Toyota","model":"Prius","owner":"Tomoko"}},
 {"Key":"CAR1", "Record":{"colour":"red","make":"Ford","model":"Mustang","owner":"Brad"}},
 {"Key":"CAR2", "Record":{"colour":"green","make":"Hyundai","model":"Tucson","owner":"Jin Soo"}},
 {"Key":"CAR3", "Record":{"colour":"yellow","make":"Volkswagen","model":"Passat","owner":"Max"}},
 {"Key":"CAR4", "Record":{"colour":"black","make":"Tesla","model":"S","owner":"Adriana"}},
 {"Key":"CAR5", "Record":{"colour":"purple","make":"Peugeot","model":"205","owner":"Michel"}},
 {"Key":"CAR6", "Record":{"colour":"white","make":"Chery","model":"S22L","owner":"Aarav"}},
 {"Key":"CAR7", "Record":{"colour":"violet","make":"Fiat","model":"Punto","owner":"Pari"}},
 {"Key":"CAR8", "Record":{"colour":"indigo","make":"Tata","model":"Nano","owner":"Valeria"}},
 {"Key":"CAR9", "Record":{"colour":"brown","make":"Holden","model":"Barina","owner":"Shotaro"}}]

実行したチェインコードの関数は次の通りです。

fabric-samples/chaincode/fabcar/fabcar.go

func (s *SmartContract) queryAllCars(APIstub shim.ChaincodeStubInterface) sc.Response {

    startKey := "CAR0"
    endKey := "CAR999"

    resultsIterator, err := APIstub.GetStateByRange(startKey, endKey)

LedgerにアクセスするAPIの仕様はこちらにあります。 godoc.org github.com

Ledgerの更新

fabcarチェインコードのcreateCarで新たなCARをLedgerに追加します。

fabric-samples/fabcar/invoke.js

var request = {
    chaincodeId: 'fabcar',
    fcn: 'createCar',
    args: ['CAR10', 'Chevy', 'Volt', 'Red', 'Nick'],
    chainId: 'mychannel',
    txId: tx_id
};

fabric-samples/chaincode/fabcar/fabcar.go

func (s *SmartContract) createCar(APIstub shim.ChaincodeStubInterface, args []string) sc.Response {

    if len(args) != 5 {
        return shim.Error("Incorrect number of arguments. Expecting 5")
    }

    var car = Car{Make: args[1], Model: args[2], Colour: args[3], Owner: args[4]}

    carAsBytes, _ := json.Marshal(car)
    APIstub.PutState(args[0], carAsBytes)

    return shim.Success(nil)
}
$ node invoke.js 
Store path:.../fabric-samples/fabcar/hfc-key-store
Successfully loaded user1 from persistence
Assigning transaction_id:  97ae720f071443b8f73b5ab1e8ed1a87d8a04ba3904479f24cdb146486edcbfa
Transaction proposal was good
Successfully sent Proposal and received ProposalResponse: Status - 200, message - "OK"
info: [EventHub.js]: _connect - options {}
The transaction has been committed on peer localhost:7053
Send transaction promise and event listener promise have completed
Successfully sent transaction to the orderer.
Successfully committed the change to the ledger by the peer

最後にCAR10が正しく追加されているかを確認します。 fabcarのqueryCarに引数CAR10を渡し、query.jsを実行します。

query.js

const request = {
    chaincodeId: 'fabcar',
    fcn: 'queryCar',
    args: ['CAR10']
};

fabric-samples/chaincode/fabcar/fabcar.go

func (s *SmartContract) queryCar(APIstub shim.ChaincodeStubInterface, args []string) sc.Response {

    if len(args) != 1 {
        return shim.Error("Incorrect number of arguments. Expecting 1")
    }

    carAsBytes, _ := APIstub.GetState(args[0])
    return shim.Success(carAsBytes)
}
$ node query.js 
Store path:.../fabric-samples/fabcar/hfc-key-store
Successfully loaded user1 from persistence
Query has completed, checking results
Response is  {"colour":"Red","make":"Chevy","model":"Volt","owner":"Nick"}

期待通りの結果が得られました。

さいごに

本エントリではサンプルアプリケーションfabcarを動かしてみました。 Ledgerにアクセスするアプリケーションの実装イメージが少し湧いた気がします。
次回はまだ未定ですが、JavaアプリケーションからHyperledger Fabric SDKを使用してみたいと考えてます。