postgresイメージは使わずにDockerでPostgreSQLに初期データを投入

はじめに

公式のイメージは使いません。
CentOS7イメージベースでPostgreSQLをインストールしたかったので、DBに初期データを投入する方法を確認しました。
紹介する仕組み自体はCentOSに依存するものではないので他のディストリビューションでも流用できると思います。
実装にあたっては一部公式イメージを参考にさせてもらいました。

実装

CentOS7イメージベースでPostgreSQL12をインストールします。
初期設定用のスクリプト entrypoint.shENTRYPOINT に、 初期データの投入後に実行するコマンド postgresCMD に指定してます。

entrypoint.sh ではコンテナ起動時( docker run )に $PGDATA が空であれば次の処理を実行します。

  • データベースクラスタの作成( initdb
  • データを投入するためにサーバを起動( pg_ctl -w start
  • /init/ にコピーしておいた setup.sql を実行( psql -f
  • サーバを停止( pg_ctl -w stop

pg_ctl-w オプションを指定しないとサーバ起動前にSQLを実行しようとしてしまうので注意です。

最後に、 exec コマンドで引数( CMD )を実行します。

setup.sql にはDBに初期データを投入するSQLを記述します。
以下の例ではデータベース your_db にテーブル your_table を作成し、適当な行を3件挿入してます。

動作確認

コンテナイメージのビルド

イメージのタグは centos7-pg12 とします。

$ ls 
Dockerfile  entrypoint.sh   setup.sql
$ docker build -t centos7-pg12 .
...
Successfully built 09c30d332bef
Successfully tagged centos7-pg12:latest

コンテナの起動

docker run によって /init/entrypoint.sh postgres が実行されます。
省略してますが、データを永続化する場合にはボリュームを設定してください。

$ docker run -itd --name centos7-pg12 centos7-pg12 
39a7f2e6b75089df8dc0cd5914f4cf4e87c9c11300093178b686dee043035449

Dockerログの確認

entrypoint.sh の実行結果を確認します。

$ docker logs -f centos7-pg12
The files belonging to this database system will be owned by user "postgres".
This user must also own the server process.

The database cluster will be initialized with locale "C".
The default text search configuration will be set to "english".

Data page checksums are disabled.

fixing permissions on existing directory /var/lib/pgsql/12/data ... ok
creating subdirectories ... ok
selecting dynamic shared memory implementation ... posix
selecting default max_connections ... 100
selecting default shared_buffers ... 128MB
selecting default time zone ... UTC
creating configuration files ... ok
running bootstrap script ... ok
performing post-bootstrap initialization ... ok
syncing data to disk ... ok

initdb: warning: enabling "trust" authentication for local connections
You can change this by editing pg_hba.conf or using the option -A, or
--auth-local and --auth-host, the next time you run initdb.

Success. You can now start the database server using:

    pg_ctl -D /var/lib/pgsql/12/data -l logfile start

waiting for server to start....2020-07-20 14:18:55.477 UTC [20] LOG:  starting PostgreSQL 12.3 on x86_64-pc-linux-gnu, compiled by gcc (GCC) 4.8.5 20150623 (Red Hat 4.8.5-39), 64-bit
2020-07-20 14:18:55.478 UTC [20] LOG:  listening on IPv4 address "127.0.0.1", port 5432
2020-07-20 14:18:55.478 UTC [20] LOG:  could not bind IPv6 address "::1": Cannot assign requested address
2020-07-20 14:18:55.478 UTC [20] HINT:  Is another postmaster already running on port 5432? If not, wait a few seconds and retry.
2020-07-20 14:18:55.482 UTC [20] LOG:  listening on Unix socket "/var/run/postgresql/.s.PGSQL.5432"
2020-07-20 14:18:55.486 UTC [20] LOG:  listening on Unix socket "/tmp/.s.PGSQL.5432"
2020-07-20 14:18:55.499 UTC [20] LOG:  redirecting log output to logging collector process
2020-07-20 14:18:55.499 UTC [20] HINT:  Future log output will appear in directory "log".
 done
server started
CREATE DATABASE
You are now connected to database "your_db" as user "postgres".
CREATE TABLE
INSERT 0 1
INSERT 0 1
INSERT 0 1
waiting for server to shut down.... done
server stopped
2020-07-20 14:18:56.126 UTC [1] LOG:  starting PostgreSQL 12.3 on x86_64-pc-linux-gnu, compiled by gcc (GCC) 4.8.5 20150623 (Red Hat 4.8.5-39), 64-bit
2020-07-20 14:18:56.127 UTC [1] LOG:  listening on IPv4 address "127.0.0.1", port 5432
2020-07-20 14:18:56.127 UTC [1] LOG:  could not bind IPv6 address "::1": Cannot assign requested address
2020-07-20 14:18:56.127 UTC [1] HINT:  Is another postmaster already running on port 5432? If not, wait a few seconds and retry.
2020-07-20 14:18:56.133 UTC [1] LOG:  listening on Unix socket "/var/run/postgresql/.s.PGSQL.5432"
2020-07-20 14:18:56.140 UTC [1] LOG:  listening on Unix socket "/tmp/.s.PGSQL.5432"
2020-07-20 14:18:56.155 UTC [1] LOG:  redirecting log output to logging collector process
2020-07-20 14:18:56.155 UTC [1] HINT:  Future log output will appear in directory "log".

データベースの確認

your_db が作成できています。

$ docker exec centos7-pg12 psql -c "\l"
                             List of databases
   Name    |  Owner   | Encoding | Collate | Ctype |   Access privileges   
-----------+----------+----------+---------+-------+-----------------------
 postgres  | postgres | UTF8     | C       | C     | 
 template0 | postgres | UTF8     | C       | C     | =c/postgres          +
           |          |          |         |       | postgres=CTc/postgres
 template1 | postgres | UTF8     | C       | C     | =c/postgres          +
           |          |          |         |       | postgres=CTc/postgres
 your_db   | postgres | UTF8     | C       | C     | 
(4 rows)

テーブルの確認

your_dbyour_table が作成されています。

$ docker exec centos7-pg12 psql your_db -c "\d"
           List of relations
 Schema |    Name    | Type  |  Owner   
--------+------------+-------+----------
 public | your_table | table | postgres
(1 row)

テーブルデータの確認

your_table に3件のデータが確認できます。

$ docker exec centos7-pg12 psql your_db -c "SELECT * FROM your_table;"
 foo 
-----
 a
 b
 c
(3 rows)

JARファイルからresources内のディレクトリをコピー

はじめに

実行可能なJARファイル(Java 8)で src/main/resources 以下に格納したディレクトリを外部のディレクトリにコピーしたかったので方法を調べました。
対象がファイルであれば java.lang.ClassLoader.getResourceAsStream()InputStream を取得して処理すれば良いです。

やりたいこと

src/main/resources/my_resource_dir というパスのディレクトリをコピーしたいとします。

src
├── main
│  ├── resources
│  │  └── my_resource_dir
│  │     └── foo
│  │     └── bar
│  │     └── ...

うまくいかない方法

IDEから実行した場合には以下のコードは期待通りに動作します。
しかし、JARファイルから実行すると IllegalArgumentException 例外がスローされます。これはファイルシステム上にコピーするリソースが存在しないためです。JARは単一のファイルなので、ファイルの一部である my_resource_dir はストリームとして扱う必要があります。

String srcDirName = "my_resource_dir"; // コピーしたいリソース
File destDir = new File("/path/to/dest"); // コピー先のディレクトリ
File resource = new File(MyClass.class.getClassLoader().getResource(srcDirName).toURI());
FileUtils.copyDirectory(resource, destDir);
$ java -jar your-jar-with-dependencies.jar 
java.lang.IllegalArgumentException: URI is not hierarchical

うまくいく方法

リンク先の copyResourcesToDirectory に答えがありました。

www.java2s.com

実行環境の判定(JARか否か)は以下のコードで実現できます。
以下のリンク先を参考にしました。

final File jarFile = new File(getClass().getProtectionDomain().getCodeSource().getLocation().getPath());
if (jarFile.isFile()) {
    // JARの場合
} else {
    // IDEの場合
}

stackoverflow.com

これで実行方法によらず resources 以下に管理するディレクトリをコピーするコードが出来上がりました。
srcDirName に与えたディレクトリ名 + / から始まるJARのエントリ(ファイルのみ)から InputStream を取得し、一つずつコピーしていってます。

String srcDirName = "my_resource_dir"; // コピーしたいリソース
File destDir = new File("/path/to/dest"); // コピー先のディレクトリ

final File jarFile = new File(MyClass.class.getProtectionDomain().getCodeSource().getLocation().getPath());
if (jarFile.isFile()) {
    // JARで実行する場合
    final JarFile jar = new JarFile(jarFile);
    for (Enumeration<JarEntry> entries = jar.entries(); entries.hasMoreElements();) {
        JarEntry entry = entries.nextElement();
        if (entry.getName().startsWith(srcDirName + "/") && !entry.isDirectory()) {
            File dest = new File(destDir, entry.getName().substring(srcDirName.length() + 1));
            File parent = dest.getParentFile();
            if (parent != null) {
                parent.mkdirs();
            }
            FileOutputStream out = new FileOutputStream(dest);
            InputStream in = jar.getInputStream(entry);
            try {
                byte[] buffer = new byte[8 * 1024];
                int s = 0;
                while ((s = in.read(buffer)) > 0) {
                    out.write(buffer, 0, s);
                }
            } finally {
                in.close();
                out.close();
            }
        }
    }
    jar.close();
} else {
    // IDEで実行する場合
    final File resource = new File(MyClass.class.getClassLoader().getResource(srcDirName).toURI());
    FileUtils.copyDirectory(resource, destDir);
}

[CentOS7] PostgreSQL9.6のYumリポジトリインストールでエラー(pgdg-centos96-9.6-3.noarch.rpmが消えた)

事象

CentOS7にPostgreSQL9.6を久しぶりにインストールしようとしたところ、Yumリポジトリのインストールでエラーが発生しました。
どうやらつい最近 pgdg-centos96-9.6-3.noarch.rpm が消えたようです。

# yum install https://download.postgresql.org/pub/repos/yum/9.6/redhat/rhel-7-x86_64/pgdg-centos96-9.6-3.noarch.rpm
Loaded plugins: fastestmirror, ovl
Cannot open: https://download.postgresql.org/pub/repos/yum/9.6/redhat/rhel-7-x86_64/pgdg-centos96-9.6-3.noarch.rpm. Skipping.
Error: Nothing to do

対策

PostgreSQL: Linux downloads (Red Hat family)で確認できるURLでインストールできます。
CentOS7にPostgreSQL9.6をインストールする場合は https://download.postgresql.org/pub/repos/yum/reporpms/EL-7-x86_64/pgdg-redhat-repo-latest.noarch.rpm です。

# yum install https://download.postgresql.org/pub/repos/yum/reporpms/EL-7-x86_64/pgdg-redhat-repo-latest.noarch.rpm
... 

Installed:
  pgdg-redhat-repo.noarch 0:42.0-11                                                                                                                                                   

Complete!

これで無事インストールできました。

# yum install postgresql96-server
...
Installed:
  postgresql96-server.x86_64 0:9.6.18-1PGDG.rhel7                                                                                                                                     

Dependency Installed:
  postgresql96.x86_64 0:9.6.18-1PGDG.rhel7                    postgresql96-libs.x86_64 0:9.6.18-1PGDG.rhel7                    systemd-sysv.x86_64 0:219-73.el7_8.8                   

Dependency Updated:
  systemd.x86_64 0:219-73.el7_8.8                                                         systemd-libs.x86_64 0:219-73.el7_8.8                                                        

Complete!

追記(2022/5/12)

9.6はEOLを迎えたため、現在では以下の手順でインストールする必要があります。

Repo RPMs - PostgreSQL YUM Repository

# cat << EOF > /etc/yum.repos.d/pgdg-96.repo
[pgdg96]
name=PostgreSQL 9.6 RPMs for RHEL/CentOS 7
baseurl=https://yum-archive.postgresql.org/9.6/redhat/rhel-7-x86_64
enabled=1
gpgcheck=0
gpgkey=file:///etc/pki/rpm-gpg/RPM-GPG-KEY-PGDG
EOF

# yum install postgresql96-server

Djangoで登録/更新/検索フォームにカレンダコントロールを設置

はじめに

Djangoで実装した登録、更新、検索フォームに以下のようなカレンダコントロールを設置する方法をまとめます。

f:id:hiroki-sawano:20200717034524p:plain

django-bootstrap-datepicker-plus (現最新バージョン3.0.5)を使用します。

github.com

前提

  • 登録、更新フォームは django.forms.ModelForm で実装していること
  • 検索フォームは django-filters.FilterSet で実装していること

サンプルアプリの実装

まずは説明に用いるサンプルアプリ(カレンダコントロールなし)を実装していきます。
実行環境は以下の通りです。本エントリの主題ではないため使用する各ライブラリの詳細な説明は省略します。

  • django==3.0.8 ※ Django 2でも良いです。
  • django-bootstrap4==2.2.0 ※ Bootstrap3でも良いです。
  • django-crispy-forms==1.9.2 ※ フォームの描画に使います。
  • django-filter==2.3.0 ※ 検索機能の実装に使います。
INSTALLED_APPS = [
    # ...
    'crispy_forms',
    'django_filters',
    'bootstrap4',
]
CRISPY_TEMPLATE_PACK = 'bootstrap4'

アプリの作成

アプリ app を作成します。

$ python manage.py startapp app

settings.pyINSTALLED_APPSapp を追加します。

INSTALLED_APPS = [
    # ...
    'app',
]

モデル

MyModel モデルに日付項目 date_field と日時項目 datetime_field を用意します。

from django.db import models


class MyModel(models.Model):
    date_field = models.DateField()
    datetime_field = models.DateTimeField()

DBにテーブルを作成します。

$ python manage.py makemigrations
$ python manage.py migrate

ビューとURL

クラスベースの汎用ビューを使用します。
CreateViewUpdateViewDjango標準のビューですが、 FilterViewdjango_filters のビューです。

from django_filters.views import FilterView
from django.urls import path, reverse_lazy
from django.views.generic.edit import CreateView, UpdateView

from app.forms import MyModelForm
from app.filters import MyModelFilter
from app.models import MyModel

app_name = 'app'
urlpatterns = [
    path('my-model/new',
         CreateView.as_view(
             form_class=MyModelForm,
             template_name='app/create_update.html',
             success_url=reverse_lazy('app:search'),
         ),
         name='create'),
    path('my-model/<int:pk>',
         UpdateView.as_view(
             model=MyModel,
             form_class=MyModelForm,
             template_name='app/create_update.html',
             success_url=reverse_lazy('app:search'),
         ),
         name='update'),
    path('my-model/search',
         FilterView.as_view(
             filterset_class=MyModelFilter,
             template_name='app/search.html',
         ),
         name='search'),
]

/app のURLでアクセスできるように my_project/urls.pyapp.urls を登録します。

from django.contrib import admin
from django.urls import include, path

urlpatterns = [
    path('admin/', admin.site.urls),
    path('app/', include('app.urls')),
]

モデルフォーム

登録ビュー( app:create )と更新ビュー( app:update )の form_class に指定した MyModelForm の実装です。
このクラスに後ほどカレンダコントロールを組み込みますが、まずは単純に MyModel の全フィールドを指定するだけです。

from django import forms

from app.models import MyModel

class MyModelForm(forms.ModelForm):
    class Meta:
        model = MyModel
        fields = ['date_field', 'datetime_field']

フィルタ

検索ビュー( app:search )の filterset_class に指定した MyModelFilter の実装です。
MyModel の全フィールドを対象に完全一致検索のフィルタを実装しています。 こちらもモデルフォームと同様に後ほど修正対象となります。

import django_filters

from app.models import MyModel


class MyModelFilter(django_filters.FilterSet):
    class Meta:
        model = MyModel
        fields = ['date_field', 'datetime_field']

テンプレート

ベーステンプレート

各テンプレートで共通する箇所を app/templates/app/base.html に実装します。
django-bootstrap4 でBootstrap4を読み込み、各テンプレートで実装する extrahead ブロックと content ブロックを用意しています。

<html>
  <head>
    {% load bootstrap4 %}
    {% bootstrap_css %}
    {% bootstrap_javascript jquery='full' %}

    {% block extrahead %}{% endblock %}
  </head>
  <body>
    <div class="container">
      {% block content %}{% endblock %}
    </div>
  </body>
</html>

登録/更新画面のテンプレート

登録画面と更新画面は全く同じ実装になるため、いずれも app/templates/app/create_update.html を使用します。

base.html を継承し、 content ブロックにフォームを実装します。
CreateViewUpdateView がコンテキストとして返す formdjango-crispy-formscrispyフィルタで描画します。

{% extends 'app/base.html' %}
{% load crispy_forms_tags %}

{% block content %}
<form method="post" class="form">
  {% csrf_token %}
  {{ form|crispy }}
  <button type="submit" class="btn btn-primary">Submit</button>
</form>
{% endblock %}

登録画面の動作確認

/app/my-model/newMyModel のフォームが表示されます。
Submitボタンの押下で新規データが登録、検索画面にリダイレクトされることを確認します。

f:id:hiroki-sawano:20200717012224g:plain

更新画面の動作確認

/app/my-model/<int:pk> でURLパラメタ pk に指定したPK値のモデルオブジェクトが表示されます。
以下の例では date_field の値を 2020-01-01 から 2020-01-03 に変更しています。

f:id:hiroki-sawano:20200717012806g:plain

検索画面のテンプレート

登録/更新画面のテンプレートとの差異は以下の通りです。

  • <form>methodget を指定
  • フォームを filter.form で参照
  • フォーム以下に検索結果( filter.qs )を表示
{% extends 'app/base.html' %}
{% load crispy_forms_tags %}

{% block content %}
<form method="get" class="form">
  {% csrf_token %}
  {{ filter.form|crispy }}
  <button type="submit" class="btn btn-primary">Search</button>
</form>
{% for obj in filter.qs %}
  date_field: {{ obj.date_field }} datetime_field: {{ obj.datetime_field }}<br/>
{% endfor %}
{% endblock %}

検索画面の動作確認

date_field2020-01-01 であるデータを検索しています。

f:id:hiroki-sawano:20200717014440g:plain

カレンダコントロールの導入

ここまででようやくサンプルアプリの実装が完了したので、いよいよカレンダコントロールを設置していきます。

django-bootstrap-datepicker-plusのインストール

pipでインストールし、 INSTALLED_APPSbootstrap_datepicker_plus を追加します。

$ pip install django-bootstrap-datepicker-plus
INSTALLED_APPS = [
    ...
    'bootstrap_datepicker_plus',
]

登録/更新画面

モデルフォームの修正

次の修正を加えます。

  • bootstrap_datepicker_plus をインポート
  • Meta.widgets の追加
    • 日付項目( DateField )の場合は datetimepicker.DatePickerInput を指定
    • 日時項目( DateTimeField )の場合は datetimepicker.DateTimePickerInput を指定

DatePickerInputDateTimePickerInputformatPythonのdatetimeフォーマットを指定します。
optionsJavaScriptdatepicker インスタンスに渡されるので、Bootstrap Datepicker Options Referenceを指定できます。

import bootstrap_datepicker_plus as datetimepicker
# ...

class MyModelForm(forms.ModelForm):
    class Meta:
        # ...
        widgets = {
            'date_field': datetimepicker.DatePickerInput(
                format='%Y-%m-%d',
                options={
                     'locale': 'ja',
                     'dayViewHeaderFormat': 'YYYY年 MMMM',
                }
            ),
            'datetime_field': datetimepicker.DateTimePickerInput(
                format='%Y-%m-%d %H:%M:%S',
                options={
                    'locale': 'ja',
                    'dayViewHeaderFormat': 'YYYY年 MMMM',
                }
            ),
        }

テンプレートの修正

extrahead ブロックに {{ form.media }} を追加します。
これでカレンダコントロールウィジェットに必要なCSSJavascriptが読み込まれます。

<!-- 省略 -->
{% block extrahead %}
{{ form.media }}
{% endblock %}
<!-- 省略 -->

動作確認

これでフォームにカレンダアイコンのボタンが設置され、カレンダコントロールで日時が入力できるようになりました。
以下は登録画面ですが更新画面も動きは同じです。

f:id:hiroki-sawano:20200717024716g:plain

検索画面

フィルタの修正

次の修正を加えます。 widget の指定はモデルフォームと同じです。

  • bootstrap_datepicker_plus をインポート
  • 日付項目( DateField )の場合は django_filters.DateFilterwidget 引数に datetimepicker.DatePickerInput を指定
  • 日時項目( DateTimeField )の場合は django_filters.DateTimeFilterwidget 引数に datetimepicker.DateTimePickerInput を指定
import bootstrap_datepicker_plus as datetimepicker
# ...

class MyModelFilter(django_filters.FilterSet):
    date_field = django_filters.DateFilter(
        widget=datetimepicker.DatePickerInput(
            format='%Y-%m-%d',
            options={
                'locale': 'ja',
                'dayViewHeaderFormat': 'YYYY年 MMMM',
            }
        ),
    )
    datetime_field = django_filters.DateTimeFilter(
        widget=datetimepicker.DateTimePickerInput(
            format='%Y-%m-%d %H:%M:%S',
            options={
                'locale': 'ja',
                'dayViewHeaderFormat': 'YYYY年 MMMM',
            }
        ),
    )
    class Meta:
        # ...

テンプレートの修正

登録、更新画面と同様にフォームの media を読み込みます。
form.media ではなく、 filter.form.media である点に注意です。

<!-- 省略 -->
{% block extrahead %}
{{ filter.form.media }}
{% endblock %}
<!-- 省略 -->

動作確認

カレンダコントロールで検索条件を入力できるようになりました。

f:id:hiroki-sawano:20200717025709g:plain

さいごに

出来上がったプロジェクトは以下のリポジトリに格納しておきました。

github.com

Djangoでsettings.pyの機密情報を管理する方法

はじめに

Djangoではプロジェクトの設定情報を settings.py で管理します。
このファイルにはデータベースの接続情報などを設定しますが、これら機密情報の管理には以下の課題があります。

  • セキュリティ上の問題となるため、リポジトリ上で公開すべきではない
  • 実行環境ごとに変わる情報であるためバージョン管理外としたい

そこで本エントリでは、機密情報をバージョン管理外のファイルで管理する手順をまとめます。
なお、説明を簡単にするため django-admin startproject が生成するプロジェクトディレクトリ直下の settings.py を対象に話を進めますが、当該ファイルを別のパスで管理している場合には適宜説明を読み替えてください。

プロジェクトの作成

my_project という名前のプロジェクトで説明します。

$ django-admin startproject my_project
$ cd my_project

プロジェクトディレクトmy_project 以下に作成される settings.py の機密情報を管理する方法を考えていきます。

$ ls
manage.py   my_project
$ ls my_project
__init__.py settings.py urls.py     wsgi.py

settings.pyの設定内容

ここでは settings.py に以下のような設定があるものとします。
データベースは標準でSQLite3ですが、ここではPostgreSQLに変更しています。

SECRET_KEY = 'noeh%g##*pneyx@stz_1b*cl6liudiw(dvsa#9xh44h0x^@gjb'
DATABASES = {
    'default': {
        'ENGINE': 'django.db.backends.postgresql_psycopg2',
        'NAME': 'my_db',
        'USER': 'my_user',
        'PASSWORD': 'maeh7Aik',
        'HOST': 'localhost',
        'PORT': '',
        'ATOMIC_REQUESTS': True,
    }
}

ここで問題となるのは以下の4項目です。各項目の用途はリンク先を参照してください。

機密情報をJSONファイルで管理

以下の手順で機密情報の管理方法を改めます。

  1. 機密情報を管理するJSONファイル secrets.json の生成スクリプトを用意
  2. settings.pysecrets.json の設定値を参照するように変更
  3. 実行環境ごとに 1.スクリプトsecrets.json を作成し、機密情報を入力

1. 機密情報を管理するJSONファイル secrets.json の生成スクリプトを用意

my_project 以下にスクリプト gen_secrets.py を作成します。
このスクリプトは機密情報を管理するJSONの雛形をプロジェクトのルートに作成します。
SECRET_KEY については django.core.management.utils.get_random_secret_key で自動生成していますが、データベース関連の項目は空文字を出力します。
プロジェクトで取り扱う機密情報に応じて secrets = {...} の辞書定義は修正してください。

import json
import os

from django.core.management.utils import get_random_secret_key

BASE_DIR = os.path.dirname(
    os.path.dirname(
        os.path.abspath(__file__)
    )
)

secrets = {
    'SECRET_KEY': get_random_secret_key(),
    'DB_NAME': '',
    'DB_USER': '',
    'DB_PASSWORD': '',
}

with open(os.path.join(BASE_DIR, 'secrets.json'), 'w') as outfile:
    json.dump(secrets, outfile)

secrets.json はバージョン管理する必要のないファイルなので、忘れずに .gitignore に指定しておきましょう。

secrets.json

2. settings.pysecrets.json の設定値を参照するように変更

以下の通り settings.py を修正します。
SECRET_KEY 等の設定値が get_secret() の戻り値となっていることを確認してください。
get_secret() は引数の文字列をキーに secrets.json から値を取得しています。
これで機密情報の管理を settings.py から secrets.json に追い出すことができました。

import json
import os

...
if os.path.exists(os.path.join(BASE_DIR, 'secrets.json')):
    with open(os.path.join(BASE_DIR, 'secrets.json')) as secrets_file:
        secrets = json.load(secrets_file)
else:
    print('secrets.json could not be found.')
    quit()


def get_secret(setting, secrets=secrets, is_optional=False): #  設定が見つからない場合にNoneを返したい場合にはis_optionalにTrueを設定
    try:
        secret = secrets[setting]
        if secret:
            return secret
        else:
            if is_optional:
                return None
            else:
                print(f'Please set {setting} in secrets.json')
                quit()
    except KeyError:
        print(f' Please set {setting} in secrets.json')
        quit()


SECRET_KEY = get_secret('SECRET_KEY')

DATABASES = {
    'default': {
        'ENGINE': 'django.db.backends.postgresql_psycopg2',
        'NAME': get_secret('DB_NAME'),
        'USER': get_secret('DB_USER'),
        'PASSWORD': get_secret('DB_PASSWORD'),
        'HOST': 'localhost',
        'PORT': '',
        'ATOMIC_REQUESTS': True,
    }
}

3. 実行環境ごとに 1.スクリプトsecrets.json を作成し、機密情報を入力

secrets.jsonの作成

以下のコマンドで secrets.json (雛形)をプロジェクトのルートに作成します。
SECRET_KEY の値は実行の都度変化します。

$ python my_project/gen_secrets.py 
$ cat secrets.json
{"SECRET_KEY": "#_odl(6s%+h_1=l95ow%5d=*=f!uzvt%*++y_7ne1%5_f(#l2(", "DB_NAME": "", "DB_USER": "", "DB_PASSWORD": ""}

secrets.jsonの編集

元々 settings.py で管理していた値で DB_NAMEDB_USERDB_PASSWORD を更新しました。

$ cat secrets.json 
{"SECRET_KEY": "#_odl(6s%+h_1=l95ow%5d=*=f!uzvt%*++y_7ne1%5_f(#l2(", "DB_NAME": "my_db", "DB_USER": "my_user", "DB_PASSWORD": "maeh7Aik"}

動作確認

データベースの用意

secrets.json の設定値でデータベース・ユーザを作成します。

$ initdb -D postgres_data
$ pg_ctl -D postgres_data -l logfile start
$ createuser -s -d -P my_user
Enter password for new role: maeh7Aik
Enter it again: maeh7Aik
$ createdb my_db -O my_user

マイグレーション

マイグレーションを実行します。これが成功すれば正しく設定できています。

$ python manage.py migrate
Operations to perform:
  Apply all migrations: admin, auth, contenttypes, sessions
Running migrations:
  Applying contenttypes.0001_initial... OK
  Applying auth.0001_initial... OK
  Applying admin.0001_initial... OK
  Applying admin.0002_logentry_remove_auto_add... OK
  Applying admin.0003_logentry_add_action_flag_choices... OK
  Applying contenttypes.0002_remove_content_type_name... OK
  Applying auth.0002_alter_permission_name_max_length... OK
  Applying auth.0003_alter_user_email_max_length... OK
  Applying auth.0004_alter_user_username_opts... OK
  Applying auth.0005_alter_user_last_login_null... OK
  Applying auth.0006_require_contenttypes_0002... OK
  Applying auth.0007_alter_validators_add_error_messages... OK
  Applying auth.0008_alter_user_username_max_length... OK
  Applying auth.0009_alter_user_last_name_max_length... OK
  Applying sessions.0001_initial... OK

サーバ起動

サーバも問題なく起動できました。

$ python manage.py runserver
Performing system checks...

System check identified no issues (0 silenced).
July 14, 2020 - 14:32:06
Django version 2.1.7, using settings 'my_project.settings'
Starting development server at http://127.0.0.1:8000/
Quit the server with CONTROL-C.

さいごに

本エントリでは、Djangoアプリの機密情報を管理する方法をまとめました。
今回紹介した内容は一つの例に過ぎないので、ご自身のプロジェクトに適した方式を検討することをおすすめします。
django-environ等を採用するのも良いと思います。

GitHubのラベルをコマンド一つでセットアップ

はじめに

GitHubのラベルをリポジトリごとに追加・変更するのは非常に手間がかかります。
本エントリではラベルの一覧をJSONファイルで管理し、コマンド一つで指定のリポジトリに反映する方法をまとめます。

github-label-setupのインストール

github-label-setup を使用します。

github.com

次のコマンドでインストールしてください。

$ npm install @azu/github-label-setup -g

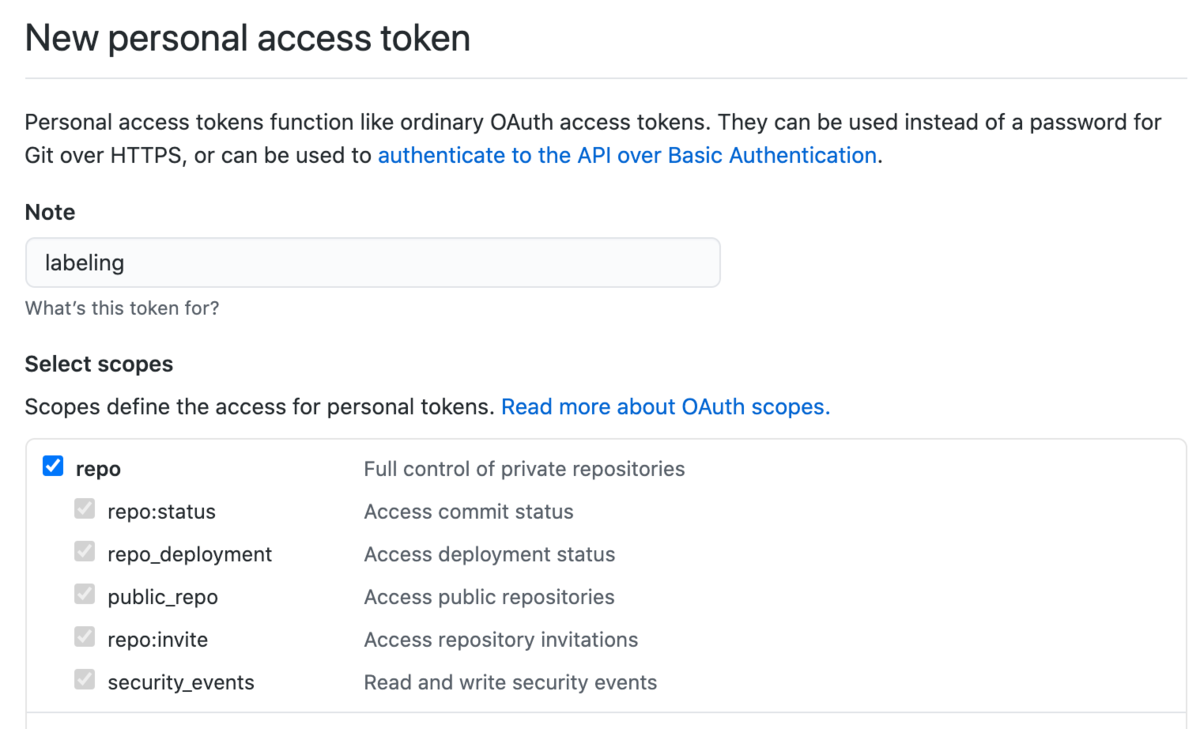
GitHubアクセストークンの作成

以下のURLからアクセストークンを作成します。

https://github.com/settings/tokens

repo スコープにチェックを入れてください。

f:id:hiroki-sawano:20200713222508p:plain

ラベル一覧の作成

標準提供のラベル一覧を参考に labels.json を作成します。
このファイルはラベルセットアップ用のリポジトリでバージョン管理しておくと良いと思います。

[
  {
    "name": "duplicate",
    "color": "ededed",
    "description": "This issue or Pull Request already exists"
  },
  ...
  {
    "name": "Type: Question",
    "color": "cc317c",
    "description": "Further information is requested",
    "aliases": [
      "question"
    ]
  }
]

ラベルのセットアップ

ラベルのセットアップをしたいリポジトリをクローンしたディレクトリに移動します。

$ cd <your-repository>

実際に変更を加える前にドライラン( -d オプション)で変更内容を確認しておきます。
--tokenGitHubアクセストークンの作成で作成したトークンを指定し、 --labelsラベル一覧の作成で作成した lables.json を指定します。

$ github-label-setup -d -A --token <access-token> --labels /path/to/labels.json
Fetching labels from GitHub
Changed: the "duplicate" label in the repo is out of date. It will be updated to "duplicate" with color "#ededed" and description "This issue or Pull Request already exists".
Changed: the "help wanted" label in the repo is out of date. It will be updated to "help wanted" with color "#e99695" and description "Extra attention is needed".
Missing: the "Priority: Critical" label is missing from the repo. It will be created.
...

変更内容が期待通りであれば -d オプションを外し、実際に変更を加えます。

$ github-label-setup -A --token <access-token> --labels /path/to/labels.json

これでラベルの変更ができました。

f:id:hiroki-sawano:20200713224956p:plain

Alexaのルーティンで音楽を停止するアクションを追加

はじめに

我が家はEcho Plus、Echo Dot、Echo Flex(+モーションセンサ)でスマート化してますが、ルーティンで再生中の音楽(Amazon Music)を停止する方法がわからなかったので調べました。

方法

こんなスレッドを見つけました。

stop music playing with a routine? : alexa

音楽を止めたい箇所でWilcoの23 Seconds of Silence(23秒の無音)を再生するというテクニックを使用します。

www.youtube.com

無音再生のアクションを追加

以下のルーティン(電気とエアコンの停止)に続けて音楽の停止アクションを実行したいと思います。

f:id:hiroki-sawano:20200713012429j:plain

Add action から Music を選択します。

f:id:hiroki-sawano:20200713012404j:plain

Play23 Seconds of Silence by WilcoFrom に音楽を停止するデバイスを指定します。

f:id:hiroki-sawano:20200713011157j:plain

これで Alexa, see you later と言うと①電気を消し、②エアコンを切り、③音楽を停止*1、してくれるようになりました。

f:id:hiroki-sawano:20200713011208j:plain

もっとうまい方法があるかもしれませんが、やりたいことが実現できたので良しとします。

*1:厳密には23秒無音を再生した後に停止